


The Edit List View Dialog
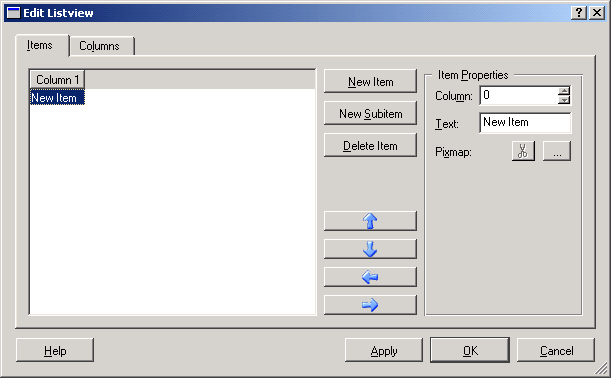
This dialog lets you edit both the entries that are displayed in a list view and the columns of the list view. You reach it by selecting Edit from the context menu of a list view.
The dialog is made up of two tab pages: Items, where you can add, delete, and modify items; and Columns, where you can do the same with columns.
The Items Tab Page
The unlabeled list view on the left-hand side of the dialog shows the items very similarly to how they will be shown in the actual list view in your application. The columns you see here are the columns you have specified in the Columns tab page (see the next section). By default, there is only one column called Column 1.
- New Item
-
Click on this button to insert a new top-level item into the list view. By default, it will have the name New Item.
- New Subitem
-
Click on this button to insert a new item that is a child of the currently selected item. By default, it will have the name Subitem.
- Delete Item
-
Click on this button to delete the currently selected item. Be careful: If this item has child items, they are deleted as well. This is the default behavior of QListView, which is why Qt Designer does the same.
- Arrow Buttons
-
With the up and down buttons, you can move an entry up and down but not out of its hierarchical level.
With the left and right buttons, you can move an entry one level up or down, respectively, in the hierarchy.
- Item Properties
-
In this area, you can specify the pixmap and the label to be displayed for any of the columns of the currently selected item. To change anything, you first select the column to be modified in the Column box. Then, to change the label, enter the new text in the Text field. To assign or change a pixmap, which is displayed next to the word Pixmap, click on the button labeled .... Clicking on the scissors icon removes the pixmap so that the current column of the current item displays only a label.
The Columns Tab Page
The unlabeled list box on the left-hand side of this tab page shows all the currently defined columns in the order in which they will appear in the list box.
- New Column
-
Click on this button to insert a new column into the list view.
- Delete Column
-
Click on this button to delete the currently selected column from the list view.
- Arrow Buttons
-
With the arrow buttons, you can change the order of the columns in the list view. Clicking on the up-arrow button moves the currently selected entry one position to the left; clicking on the down-arrow button moves the entry one position to the right.
- Column Properties
-
In this area, you can specify the pixmap and the label to be displayed in the header of the currently selected column. To change the label, enter the new text in the Text field. To assign or change a pixmap, which is displayed next to the word Pixmap, click on the button labeled .... Clicking on the scissors icon removes the pixmap so that the current column of the current item displays only a label. Finally, you can check the Clickable check box to let a click on the column header select all the items by the values in this column, and the Resizable check box to allow the user to resize the column by dragging the space between this and the next column in the column header bar.
| The Edit List Box Dialog | The Edit Multiline Edit Dialog |